How to Burn Beeswax Pillar Candles
Pure beeswax pillar candles are best-sellers at Bluecorn for a reason — they offer incredibly long burn times, great hot throw (beeswax scent while burning) and gorgeous golden glow.
Large beeswax pillars need special care to burn their best. It's a craft unto itself and a meditative ritual that for many beeswax candle enthusiasts signifies the essential beeswax candle experience.
Beeswax Pillar Candle Burn Tips:
Burn for 3-6 Hours at a Time: The most important thing to know about large beeswax pillar candles (3-inch and 4-inch diameter) is that they are engineered to burn for a long time.
If you extinguish them too early, the wax to wick ratio can get thrown off and create real problems later on in the burn.
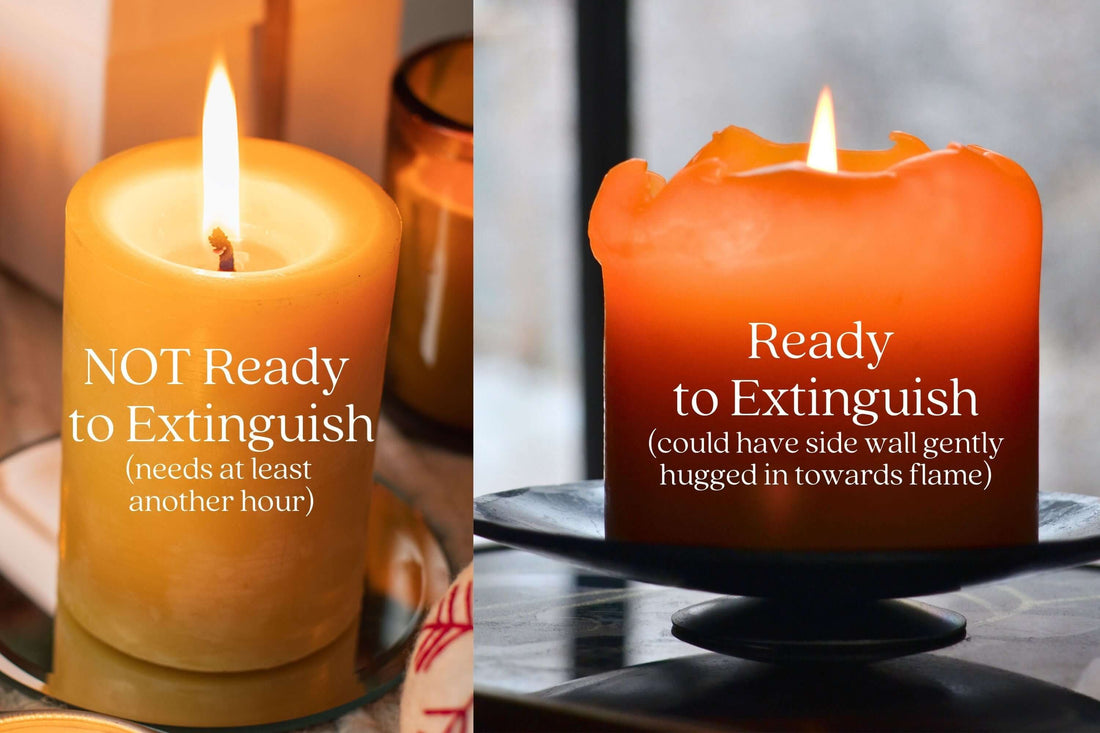
Typically 3-inch diameter pillars need to burn for at least 3 hours at a time and 4-inch diameter pillars do better with 6+ hour burns. In general its best to let these candles burn until the side walls are less than 1/4" thick.

Candle Hugging: a little goes a long way. As many savvy candle burners know, gently molding the edges of your pillar candle around the flame can reverse early tunneling, stabilize a jumpy flame and generally help your candle use its beeswax most efficiently. Plus, it creates a gorgeous lantern-like effect.
HOWEVER over-molding can actually create tunneling! This is the most common burn issue folks reach out to us about.
Pushing the wax down like a pie crust causes the "burn pool" of melted wax to rise too high and drown the wick. With only spent, fully-carbonized wick exposed to oxygen, the wick can't hold a flame, melt beeswax, and start drawing fuel. TLDR: pushing too much wax towards the flame will put your candle out and make it hard to relight.

What to do with a tunneled/ over-molded beeswax pillar: It happens! If your pillar candle has suffered a few short burns but is still lighting, just give it a good long burn (like really long, probably 5+ hours). Only extinguish when the side walls are less than 1/4" thick.
If you've already got some substantial tunneling on your hands, you might notice your candle flame getting a bit weak a few hours into this recovery burn. You can carefully pour off a little molten wax into the trash or compost. This should help the wax to wick ratio recover and keep your flame bright and healthy.
What to do if your pillar candle won't relight: When a beeswax pillar candle won't relight, it's usually because you need to expose fresh wick. The easiest way to do this is to hold a flame to the base of the wick and drain away the first molten wax.
In more serious cases, you might need to warm the wax around the base of the wick with the flame and then carve out around the wick using a butter knife. Once enough fresh wick is exposed, the wick should be able to hold a flame and begin wicking molten beeswax as designed. After that, you just need to keep your burns long and your molding to a minimum.
What to do about an over-large or jumpy flame: Always trim your wick to 1/4" before lighting your pillar candle. If over the course of the burn the wick gets long, produces a mushroom of carbon at the tip, or the flame gets big and jumpy, you can always blow out the flame and re-trim the wick before relighting.
If you have tall side walls less than 1/4" thick, you can gently hug them in (think open, cresting wave shape) to melt more beeswax and calm the flame.
Burn Free-Standing: Pillar candles are designed to burn with at least a few inches of space around them, typically on a heat-proof base. Grouping pillar candles or placing them inside glass jars or lanterns will increase the radiant heat around the candle, melt the wax more quickly, and generally accelerate the candle burn. This can be useful when correcting tunneling, or it can lead to a sad, drippy mess. Proceed with caution and keep an eye on arrangements like these.
Questions? Reach out! Our candle experts are dedicated to the craft and happy to help. The best way to reach us is via email: sales@bluecorncandles.com
